
Fixtures
A table of every fixture in your project, where you add, patch, edit, and delete them.
The Fixtures panel lists every fixture in the current project in one table, where you add, patch, edit, and delete them.
Related concept: Fixtures.
Fixture list
Display
The table has these columns:
- Name, the fixture's name, with a unicast IP indicator if one is configured.
- Uni, the universe number, starting at 1.
- Adr, the 1-based start address.
- A last column with edit and delete buttons for the row.
Sorting
The table sorts by universe first, then by address within each universe. Click a column header to sort by that column, and click it again to reverse the order. Sorting by Uni restores the universe-and-address order.
Filtering
The search box in the toolbar filters fixtures. Each word you type must appear in one of the columns, so "spot 3" finds a fixture named Spot 3.
Adding fixtures
Add fixture dialog
- Click the Add fixture button in the toolbar.
- Click Select fixture… to open the Add fixture picker. Browse by manufacturer or use the search box, and pick a fixture. Choose its DMX mode, then click Continue to addressing. A fixture your library lacks can come from GDTF Share, as Add a fixture describes.
- The Add fixture form opens. The form sits on the left. On the right, an Address space grid shows existing fixtures and the proposed placement.
- Set the quantity and name. Then set the start address in one of three ways:
- Type the universe and address.
- Click Calculate universes/addresses to enter the next free address.
- Click a cell in the grid. Hover over a cell to preview the placement.
- Click Patch N fixtures to add them.
Color notes
Under Color notes, above the channel map, the picker lists what the selected fixture cannot do with color in the selected mode. Read them before you continue, because this is the easiest point to choose a different mode or a better GDTF file.
An amber dot marks a note worth acting on:
- The definition carries no measured color data, so colors come out close to what you asked for. A GDTF file from the manufacturer with measured emitters fixes it.
- The definition's color data is doubtful. It rates one emitter brighter than the whole fixture, says every emitter is equally bright against its own measurements, or names a white the emitters cannot mix.
A gray dot marks a note about how the fixture works, and it needs no action:
- A three-emitter head has one recipe per color, so Tuning changes nothing on it.
- A color-mixing mover takes its filters only from an xyY or Temp color.
- A fixture with a second set of color emitters exposes them as plain faders.
- A warm/cool white head mixes along one line between its two whites.
The notes belong to the mode, so they change when you pick another one. A fixture with nothing to report shows no notes.
To browse or import fixture definitions, use the Library Manager at Project > Library Manager.
Selecting fixtures
Click a row to select a fixture. Shift-click selects a range, and Cmd-click adds or removes a single row. From the keyboard, move with the arrow keys and press Space to select the focused row. Bulk operations can select only fixtures that no fixture layout uses.
Editing fixtures
Edit dialog
- Click the pencil icon on the fixture row, or right-click and select Edit.
- Change the name, universe, address, mode, target IP, pan and tilt settings, beam, and color wheel setting in the popout.
- Click Save changes to apply.
Pan and tilt
Moving heads and scanners get a Pan and tilt section in the add and edit forms. Use it when a fixture is rigged differently from the way its definition describes it:
- Invert pan reverses the direction the fixture pans.
- Invert tilt reverses the direction it tilts.
- Swap pan/tilt sends your pan value to the fixture's tilt channel and your tilt value to its pan channel.
To stand a fixture on the floor, turn it 180° about X in its layout, as Moving heads sit as they hang shows.
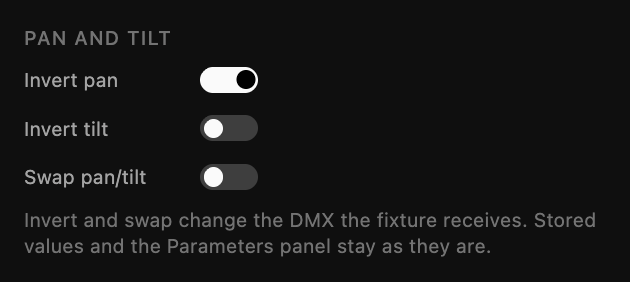
Invert and swap change only the DMX the fixture receives. Values in the Parameters panel and in your effects stay as you set them. A fixture turned around on the rig thus needs the setting and no reprogramming. Swap applies before invert. With both on, Invert pan reverses the fixture's pan channel, which then carries your tilt value.
When the fixture's definition gives a pan or tilt range in degrees, invert reverses only that range. Values outside it (a reserved band at the top of the channel, say) keep their function. Swap keeps to those ranges too. The full travel of your pan value maps onto the range of the tilt and no further, so a swapped value never lands in a reserved band.
The form shows only the settings a fixture can use. A fixture whose definition describes no moving heads has no Pan and tilt section. Swap pan/tilt appears only when each pan has a tilt of its own to trade with. A bar whose lamps pan separately under one shared tilt offers no swap, and neither does a bar that only tilts.
Sometimes the project's copy of a fixture's definition has no pan or tilt, but the library's copy does. In that case, the section shows a note and an Update definition button in place of the settings. The button replaces the project's copy with the library's copy, and any edits made to the project's copy go with it. You can undo it. Until then, a layer whose effect moves heads leaves this fixture where it is.
Color
By default, a fixture whose only color comes from a color wheel turns its wheel to the effect color, as Color describes. Once a layout places the fixture, its edit form shows a Color section with Color wheel follows color. Turn the switch off to set the wheel by hand. The Parameters panel, a layer's channel routing, and MIDI or network input mappings then control it. While the switch is on, those controls read Follows color and take no input.
Beam
The generic fixtures have a Beam section in the add and edit forms, which tells the Preview how their light leaves them. They are the Single White, Single RGB, Single RGBW and Single RGBWAUV, the 4-Lite Blinder, and the generic LED bar, circle and matrix.
- Type picks Spot, Wash, PC, Fresnel or Rectangle. Its first option sets no beam. On the 4-Lite Blinder it reads From fixture, and the blinder keeps the front-facing washes it draws on its own. On the others it reads No beam, and the fixture shows only its pixels.
- Beam angle is the full width of the beam in degrees, from 1 to 359.
- Field angle is the wider angle where the light fades out, from the beam angle up to 359. If you leave it empty, the Preview chooses one.
- Facing is the way the beam points before the fixture's layout turns it: Down, Up, Front (towards the audience), Back, Left or Right.
Every pixel of the fixture draws the beam. When Type is set to Wash, a fixture of more than 64 pixels joins the washes that point the same way into one soft volume. A long generic LED bar thus lights up as one wash along its length. A smaller fixture draws a wash per pixel. A blinder aimed at the audience is a Wash at 60° facing Front.
Preview
A fixture with more than one wash lens, from its profile or its beam setting, has a Preview section with Individual beams. When it is on, the Preview draws each wash lens as its own beam in its own color. When it is off, the lenses that point the same way draw as one wash. It starts on for a fixture with up to 64 wash lenses and off for a larger one. The setting changes only the Preview, not the DMX the fixture receives.
Context menu
Right-click a fixture row for these options:
- Edit opens the edit dialog.
- Delete removes the fixture from the project. It is disabled while a layout uses the fixture.
- Add fixture opens the add fixture dialog.
Multi-selection
Select several rows with Shift-click or Cmd-click, and a Delete button appears in the toolbar. It removes every selected fixture that no layout uses.
Sharing the patch
The toolbar has Print as PDF to save a patch sheet locally, and Create shareable link to publish one to a public URL. Once a link exists, that button reads Update shared link, and Stop sharing removes the link. See Share a Patch.
Status indicators
- A blue network icon means the fixture has a unicast target IP.
- A red network icon means the network mode is unicast but no target IP is set, so Spectralite sends the fixture no data.
- A shield icon means a layout uses the fixture, so you cannot delete it.
Fixture definitions
Create, edit, and browse fixture definitions in the Fixture Editor at Project > Fixture Editor. Browse and import from the library in the Library Manager at Project > Library Manager.
Related panels
- Library Manager holds the fixture library.
- Address Space shows the DMX overview.
- Parameters sets fixture parameter values.